Sunday, November 20, 2011

Robots in Drag (when choices are limited, customize!)

As a mother to two little girls, who I generally really enjoy dressing,  I have also come to despise certain color combinations and motifs found all to commonly in girl's apparel.  I can't stand "bubble gum" pink.  Put pink together with white and purple?  UGH.  Add some lace and flowers and I just want to barf.....and to make it worse, the barf will show up as these colors are notorious for showing every single speck of kid gunk.
My latest trip to Target to find some shirts for Bea was pretty underwhelming.  As a former apparel graphic designer, I totally get why the market trends towards the "safe", and predictable when the economy is in the shitter.  But, that doesn't mean I'm going to go along with it.  Conversely, I don't believe in shelling out more than $30-$40 for a single item of "boutique" kids clothing.  So, I thrift.  I sew.  And as of lately, I customize.


The above shirt I found in the Target little boy's department.  I thought the colors were great for Bea.  The robots are cute (she likes robots).  But, I also thought that I could "girl it up" just a bit and add some personality.  After a little ribbon, a few rhinestones, a crocheted flower and some purple tulle, it became this......

All "girled up".  Without the usual stuff.....


I like how these two seem to be having a conversation.

A robot in a fuzzy blue boa and rhinestone earrings?  Why not?  My favorite though is the purple tutu.  It's like he's saying,  "hey, check out my tutu.  Isn't it cool?

This was a fun one.

Sunday, November 13, 2011

Upcycled Cashmere.....what to do with a pile of thrifted sweaters


This is kind of a followup from a previous post, "The Cashmere Hoard", that I wrote last Spring.  I've continued to hack, scrap and sew my way through a giant bag of thrifted cashmere and wool sweaters, making the usual leg warmers but also three sweaters for Lola.


"Bunny People"


Lola, Easter 2011


My latest Lola sweater. 
Cashmere scrap appliqued mushrooms on a sweater made from a burgundy wool cardigan that I wore about 20 years ago along with brown cashmere ribbing.  The ribbing at the shoulders was actually the result of screwing up the armholes to where I needed to add fabric back in.  I love happy accidents.


Next, I will finally be making a sweater dress for Bea.

Wednesday, November 9, 2011

Cider Press Restoration (and subsequent cider enjoyed)

So, this actually happened over a month ago.  But, at the moment, I'm pinned down with a sleeping baby without access to my camera to download more pics of the stuff slated to be sold on ebay.  But I digress....

This was actually a fun, though time-consuming, dirty but ultimately rewarding project that I took on this past September.  The cider press has been in my family for about 50 years or so.  My uncle found it somewhere in Castle Rock, Washington and gave it to the Huson/Kiser clan since we had access to plenty of apples.  So, this was the press that we used to make cider when I was growing up.  I have very fond memories of it.

When I got a hold of it a few months ago, it was in pretty sad shape.  I didn't bother to take pics but basically I had to grind of years worth of rust and repaint.  The staves of the basket, originally fir, were filled with powder post beetle holes.  I found some locally grown and milled alder wood for replacements.  Also, new screws, new drain board (an Ikea carving board, which I carved additional drain channels into), new press disks (made from Doug fir) and new tamper.


Anyway, the big debut just happened to fall on the last sunny Saturday in early October.  With a small gathering of friends and neighbors, cider was pressed and enjoyed along with bratwurst, "blaukraut", fried potatoes, spinach salad, fresh pretzels and my mom's delicious raw apple cake.


 About 200 lbs. of apples were pressed, yeilding, I figure, about 5 gallons of cider.


Most of the cider was enjoyed fresh and taken home by our guests. The remaining is still fermenting!  And that will lead me to a separate posting later.


Friday, October 21, 2011

Blood Brothers Corn (from seed to cornbread in six months)

Okay, so it's been awhile since I've done anything with this blog......But, I have been BUSY.  Life is what happens when you're not sitting in front of a laptop.  I digress though, and what I want to post here today is my adventure with growing an heirloom corn, grinding flour and ultimately making my own cornbread (with cracklin's).
In the past, corn has not really been my favorite crop.  It can be a fussy germinator.  It needs lots of space, water and further fussing.  However, ever since reading Michael Pollan's "Omnivores dilemma" I have been intrigued by the fact that it is a "human-made" and also very much human reliant plant.  Contemporary, GMO corn is also very much a manmade thing, but my interest here is with heirloom varieties that have come into being, not in a laboratory, but from millions of years of human meddling.  It really is an interesting and beautiful plant.


I selected a red flour corn for this years crop.  "Blood Brothers", is the result of crossing Aztec Black and I think Mandan Bride.  I wouldn't really call it red, but rather red/purple, especially when dried, as pictured above.

I planted seed back in late April in roughly a 12' x 12' block.  Instead of rows I staggered the seed hills so that they were about 18" apart in all directions.  Three-four seeds per hill, later to be thinned to the one strongest per hill.  Despite the cold Spring this year (again), they all did pretty well germinating.


One month old plants--or therabouts.


Blood brothers is a rather short corn.  It only grew about 5-6 feet high.  It produces well though.  I harvested it in September and hung it to dry on the cob for about a month or so before twisting it off the cobs and further drying the seed in the dehydrator so that it was totally dry for grinding.


It took about 3-4 passes with the hand grinder to get a medium textured cornmeal.  If I do this again, I think I may invest in an electric grain mill--though it is good exercise for ones arms!


Once ground, I decided to search the web for a good Cracklin Cornbread recipe and since I still have a large quantity of nice organic, pastured pork fat in the freezer, I made my own cracklin's.

here is the cubed up fat, before rendering......


and after.....


The end result.  Yummy little cracklins and rendered lard.


On to the cornbread making.  Followed the recipe for the most part, except I didn't have any buttermilk so I added some vinegar to a cup of milk as a substitute.  I was also able to use the lard that was rendered from the cracklin's instead of bacon fat.


The batter goes into a hot skillet with melted lard in it.  Then into the oven.


The end result.
This ain't your momma's cornbread!

The actual color was difficult to capture, but it was very close to blue tortilla corn chips.
The outside edges were browned and very crisp and tasted a bit like corn dog batter.
The inside, moist and crumbly.


Overall, it had a really good flavor, perhaps a bit stronger and "cornier" that your average cornbread.


So,  there it is.....

I plan on using the cornmeal for polenta as well. 

I saved some seed for next year but have already found some new varieties that look interesting as well.  Floriani Red Flint, and Oxacan Green Dent are amongst a a few that I may end up trying.


Wednesday, April 27, 2011

Homemade Chocolate Mini Eggs in a Chocolate Nest


I've always liked easter, and have many fond childhood memories of the holiday.  Now that I have two little girls, I'm hoping to provide the same for them.
Amongst the regular easter activities, this year I decided to make an edible nest and chocolate eggs.  After combing the web for recipes, I founded upon a recipe for shredded wheat nests, on the blog of a mom and food writer, Amanda Grant.  I was looking for realism and good ingredients and this one seemed to fit the bill.
As for the eggs, they were my own invention with the help of two sized of chocolate candy egg molds, a cheese grater, paint brushes, the microwave and freezer.  With a bit of experimentation, I ended up creating three different colors/flavors:

  • Coconut    Blue tinted white chocolate with dark chocolate speckles.  Dark chocolate and toasted coconut center.
  • Cherry almond    Pink tinted white chocolate with dark chocolate and ground almond speckles.  Milk chocolate covered dried tart cherry center.
  • Chocolate Orange    White/dark chocolate with candied orange peel center.

I assembled these by first making the centers with the smaller egg molds.  Then, using a sort of "reverse painting" method, I applied melted white chocolate with a brush to the larger sized molds.  Grated dark chocolate was sprinkled on top of the white chocolate to create "speckles".  Then, the rest of the mold was filled 3/4 of the way with tinted white chocolate (in the case of the coconut and cherry ones, that is) and the previously made, smaller centers were pressed into the molds before they solidified.  Since the egg molds only made "half an egg", I then took two halves and fused them together with more matching melted chocolate.......whew!  Actually easier to do than explain!
Anyway, they were a hit, not only with my four-year-old but also the adult relatives.  These were fun to make.  They actually did take a fair amount of time, but the great thing about chocolate is that you can do a little at a time (which I did), way in advance (which I also did) and they will keep in the fridge.

Served up after easter dinner on top of little goblets with Bishop's weed garnish.


Shredded wheat being arranged inside a cupcake paper placed in a shallow dish.


Making the chocolate orange eggs.  This was a great use of the candied orange peel I've had on hand in the freezer since Christmas.


Last one....and now gone.  Consumed by Bea and I today after I photographed it.


Friday, April 1, 2011

Meddling with the Nettles


Stinging Nettles.  Urtica Dioica.  Bane of my childhood forays into the woods and in later years, during my "Native American" phase, a source of fiber used to make an incredibly strong bow string.  This week was my first experience harvesting, cooking and eating them.  They were delicious.


The harvest site:  
A large colony of young nettles on the south side of the family barn in Kelso, Wa.


I was inspired to eat nettles by a recent dinner at DOC, where Damon and I enjoyed a course of petrale sole, corona beans and nettles in browned butter.  Though I searched and didn't really find much in the way of recipes that resembled the above, I did find quite a bit of info on how to gather, process and cook nettles.  I knew in advance that they are best harvested young, which they still are here in late March.  I did not know, however, that even these lush young shoots carry as much sting as the full grown version. You must wear gloves--and thick ones!  Surgical gloves are not enough.
The top three or four inches of the nettle shoot is the only part you harvest.  The older the plant and the further down the stem, the more fibrous they are (there is a reason why nettles have been used for centuries for rope and cloth).
Once gathered, it's to the kitchen for blanching time......


Gloves are still necessary until the nettles are tossed into a pot of boiling water and blanched for 2-3 minutes.  This process renders them stingless.


Plunged into cold water to stop the cooking.......


Then drained and squeezed dry in a towel and chopped fine.  This is actually where the recipe I chose begins, for a Goat Cheese and Nettle Tart,  courtesy of the blog called "Clogs" of a chef in Seattle.


Chopped nettles are tossed with shallot sauteed in butter and placed in a tart crust.  Then poured over with two eggs beaten with heavy cream and curds of goat cheese.  Into the oven it goes.

Nettles are very nutritious.  Loaded with vitamins, they are regarded similar to dandelion greens and such as a "spring tonic".  I'm not so sure how cleansing they are after being loaded with cream and goat cheese!....but hopefully the benefits were still there.  Damon described their flavor quite accurately as a "cross of spinach, mint and parsely".  It was enjoyed (and gone) by all (except Beatrice) with a dinner of roast chicken and asparagus.

Thursday, March 24, 2011

Kale Shoots....it's not over when it starts to bolt


Gardening can sometimes be a sadistic hobby.  The rewards are there, oh yes, but reaping them often involves a merciless and random gauntlet of abuse delivered by mother nature:  A brutally cold winter followed by an unseasonably cold and WET Spring.  A plague of SLUGS that gleefully eat the tops off sprouting peas.  Unknown forces that make cabbage starts lose the will to live. .....I could go on.

I went out to the Sauvies garden plot today.  In 43 degrees and pouring rain I planted leek starts and radish seeds.  I replanted peas (1/3rd of which had rotted since early march) and put out slug bait, cursing all the while.

The brassica starts that were planted late last summer (those that survived) have had enough.  Instead of providing lush Spring growth, they are putting their last bit of energy into bolting-- the plant way of saying, "I'm tired and I'm done with this life.  Here's some seed.  Good luck to the next generation."

I discovered last year that these sprouts from bolting kale are good to eat.  Like tiny heads of broccoli, just as tender but with stronger flavor, they are nutritious and thrifty way of getting at least something out of kale that would otherwise be pulled and tossed in the compost.


Sauteed in a little grape seed oil with garlic, kale shoots are quite tasty.
The saving grace of my gardening endeavour today.

Here's to warmer weather.

PLEASE.

Tuesday, March 22, 2011

The Morels of the Story


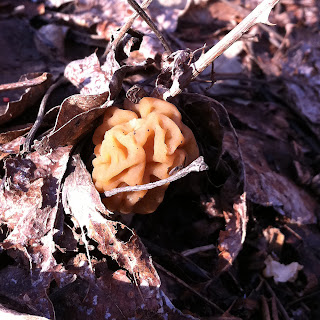
"Hello my little friend..."

A late afternoon break in the rain and a trip to...... um, where I like to go looking for Spring morel mushrooms, yielded just two of the little critters.  It's early.  I guess.  I'm still relatively new to morel hunting and am still trying to pinpoint the actual season, which I'm finding must be late March into mid-April.  With this year's (and last year's as well) unseasonably cool weather, it seems that the season may be on the late side.


Spotting these little brainy looking fungi is tough on the eyes.  Unlike bright golden Chanterelles growing in dark forest duff, morels bear almost the same color as the grey-brown cottonwood leaves that they emerge from.  Making things even more sporting, they also like to take cover amongst blackberry thickets.  I rarely return from morel hunting without at least one scratch somewhere.  


  I hauled home "the bounty" of two.  Sauteed in butter with garlic, they where tasty with the braised pork we had for dinner.  I just hope I can get more.  Please.